Propellant and Composite Post Cure Oven
Introduction
This describes some recent history and work on my Propellant and
Composite Post Cure Oven.
I originally built this to cure PBAN
Composite Propellants as they require a 140F cure temperature to
cure in several days (vs months at room termperature). As I got into
making epoxy composite structures I
started using it also for both accelerated cures as well as post cures
of these structures. It's very handy to have an epoxy lamination, made
with 24 hr slow cure epoxy, ready to handle if not fly in several
hours. I've also built a Airframe
curing and post cure oven.
Current Construction
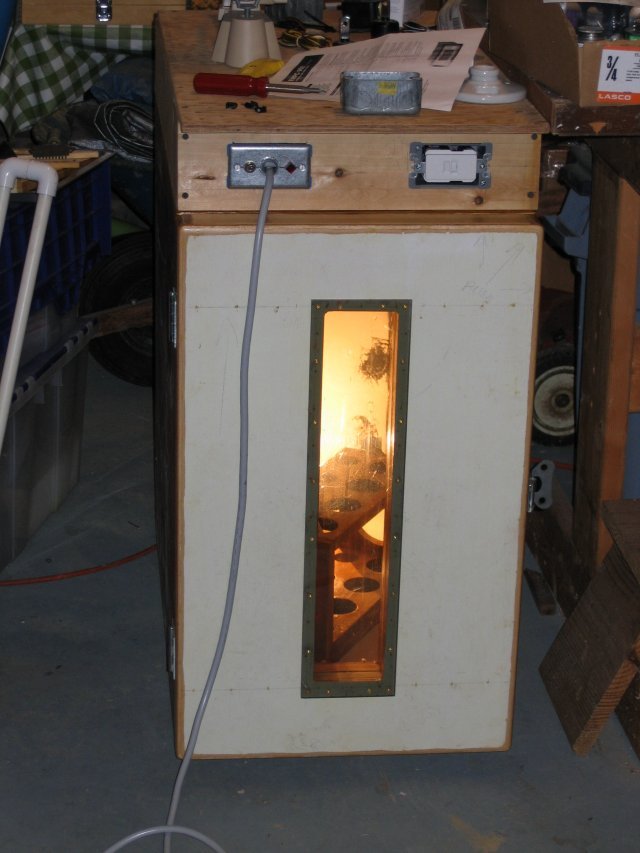
This photo shows the current
construction of the oven. All walls and the door are about 2.75" thick
- essentially available wood originally skinning 2" thick Corning pink
styrene foam insulation board.
The inside dimensions are about 12..5" wide by about 28" deep by about
24" tall. The width and depth is designed to accomodate Jelly Roll
baking pans which make very handy trays. The extra depth to accomodate
the heat source in the back, and the height as tall as possible to fit
under a workbench.
The window is triple pane and I find worth the effort to install
(whether or not triple pane, it's triple as I had the material handy).
Most folks seem to make curing ovens by taping the foam board together
and working out an arrangement of lights. I went the extra two miles as
I'm largely comitted to PBAN for my composite propellants. Ok, I just
can't help myself. One nice advantage is that this oven will quickly
get to temperature with as little as a 150-175W bulb even in a cold
garage. That means faster start up times and also faster recovery times
for when the oven is accessed. It also provides a very gradual ramp
down, which can be useful for proper post cure ramp downs. For
instance, taking several hours to drop from 140F down to 100F.
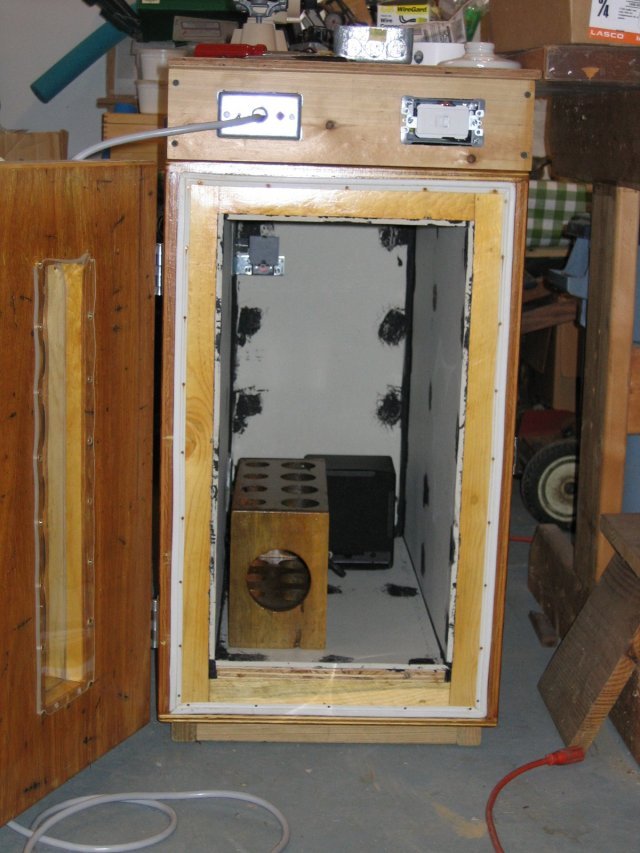
Here's an inside view. You can see my
propellant curing rack (for 54mm and 38mm grains), and an interim heat
source.
This is Version II with the new lining. I had a couple of temperature
excursions. They caused the pink foam to overexpand and pop the
original luan plywood liner and distort the walls. I wish I had
pictures of that. It also warped the inside window pane as you can see.
I used it this way until I had a break to rebuild. I have replaced the
inner window panel with polycarbonate which is heat tolerant in this
range. It used to be plexiglass as the middle and outer panes
remain.
I gutted the box to replace the insulation. It turned out to be a push
vs starting from scratch as I'd used lots of construction adhesive and
it was difficult to gut without destroying it. But I perservered.
To avoid overexpansion of the foam I am ensuring I don't have over temp
excursions, and I also used R-15 fiberglas insulation, which will not
expand. I then also re-lined it with Hardi-Backer cement board instead
of plywood. This provides for much greater tolerance for proximity to
heat sources. The black spots are a fireplace pointing compound I used
to spackle the recessed screw holes.
I must note that Hardi-Backer board is a Royal PIA to work with.
Cutting it is an inhalation hazard and it will quickly make any blade
ignorant. Scoring and snapping is best, but if you guess wrong and need
to file to fit, well, you'll have some biceps when you're done. Next
time? I dunno.
It IS very heat resistant. With plywood I had an elaborate arrangement
of aluminum heat shields around my light bulb heat sources. Hardi
Backer does also seemto be hygroscopic as I haven't had a run
when it's not quite steamy when opened. I may try to seal it with some
sort of high temp epoxy or furnace sealer. Next time? I dunno. Maybe
back to luan with a waterglass fire retardant coating?

In version one I had a fancy electronic
temperature controller. After a couple temperature excursions I am
re-designing. Right now I have mounted a water heater thermostat into
the upper corner. Depending on the model they have a working range in
the 100F - 190F range. This one 90F to 175F. That's a decent range for
most work. PBAN cures at 140F usually. AeroPoxy post cures at 170-180F.
The only disadvantage of these is the hysteresis. It's about 18F. So if
it's set to 150F, it won't reset and come back on until it's dropped to
142F. It's workable, but I prefer the tighter range of electronic
controls, where I usually ran within a couple degrees and could have
had it pegged within 1F if I didn't want to be nice to my bulb.
No matter what controls you use, I very strongly recommend a mechanical
high current sturdy high temp limit switch even if using electronic
controls for your fine temp control. Right now, the water heater
thermostat suffices for both, but when I add the electronics back in I
will either leave this one in, or put in a CanTherm snap action
thermostat at perhaps 190F as an absolute over temp backup.
Do note that I very highly recommend (1) your overtemp limit be
positioned at the top of the oven, and (2) that your temperature source
be positioned near the bottom of the oven. Even in this small oven I
found the temperature difference as high as 40F between the top and
bottom, and in my overtemp occurances the foam at the top had over
expanded and nearly melted back while that at the bottom was undamaged.
So having your measurement at the top ensures no part of the oven
reaches over temp, and having your temperature source at the bottom
encourages at least some convection circulation.
History
I think I rattled off most of the
history of this thing already. But I'll trim the content elsewhere and
move the history more down here.
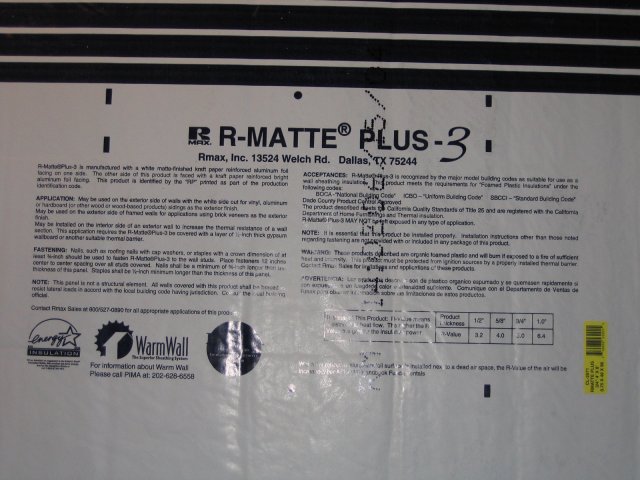
Insulation & Lining
Pink Foam
R-Matte Plus 3
Fiberglass Insulation R-15. (peel off the flamable tar paper layer)
Hardi-Backer board
Temperature Regulation, Heat
Sources, and Fans.
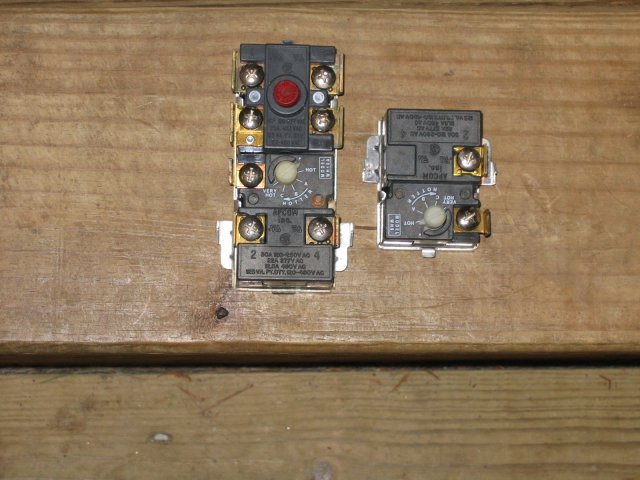
These are water heater thermostats I
salvaged from my 6 year old heater that ruptured it's tank. That
problem was the Sacrificial Anode and if you don't know what that is
you should learn and check yours and save yourself a lot of money on
unnecessary repairs.
The left unit will allow either itself or the right unit to be
operational, but not both. We don't care about that mode. They're
otherwise identical. The left unit also has a 190F overtemp safety
limit on top, shown as the red button. That limit is a handy temp
limit, but note that overtemp limit doesn't automatically reset. You
may or may not care. If it does overtemp, it may well be best to have
it shut down and stay that way.
If you can't scavenge some you can pick them up new very inexpentsively.
I will elaborate more on electronic controls in a bit.
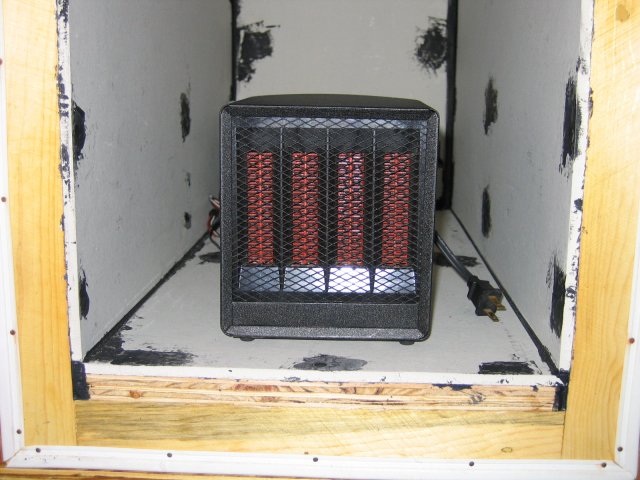
Here's a 1500 watt space heater. I
really only need 175-200 watts to run this oven, but 1500W sure gets it
toasty quick, and does seem to help if I want to push 175-180F for
epoxy post cures. The Hardi-Backer board seems to be able to take
proximity to this heater.
Usually, however, I run either a single 200W or 2x 200W bulbs. I will
illustrate that. I also recommend a fan to stir the air - otherwise you
will have uneven
temperature distribution. This 1500 w heater has a built in fan. I use
an external fan with the light bulbs.
For Fans, you have to be aware that most weren't designed for these
temperatures. Actually, most heaters weren't either.
You will also notice in the top picture the ground fault interrupter.
In the first excursion it tripped my GFCI in the garage. I decided I
didn't want to miss out on that bit of safety no matter what it was
plugged into so I've included one in the cabinet itself for an extra
measure of safety.
Aside from electronic temperature controllers, you may also consider
more manual regulation. There are some easy choices. A light dimmer
works great for lights and lower powered heaters. Most will actually
handle upwards of 600W which is a lot of heat, though not enough for
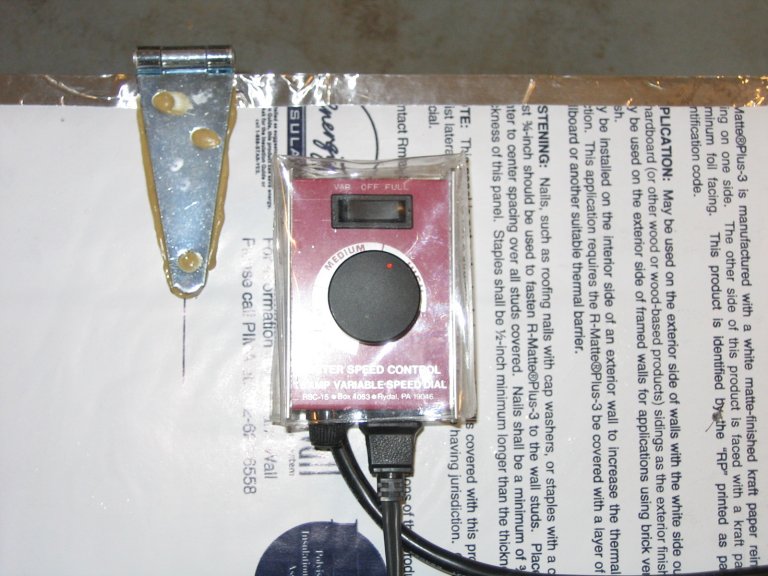
most heaters proper. For higher wattage a router speed controller is an
excellent choice and a 1500W resistive load is a cake walk for them.
Here's my router speed controller. It also works well for controlling
the heat in a
KNDX/KNSB Candy
Propellant kettle. Do note that the fans in some heaters will not
like the speed controllers and they usually won't spin. My ceramic
heater shown above has a computer style fan inside that won't work with
this controller, much to my dismay.